Wednesday, July 27, 2016

A New A.E. Quickie - Pokemon Pikachu

It seems as if Pokemon Go is now all the craze and not just locally, but globally!

So, I decided (just like any other normal-minded individual), to create a derpy Pikachu and rig / animate it!

However this A.E. Quickie was not just a Quickie for Pokemon's sake, but actually an applied technique of mine that I have been studying and improving upon.

One of my goals as an After Effects technical animator is to make After Effects look more organic.  After Effects suffers from what I call the 'Tasty Spam' treatment, it can taste good, but it's so processed and fake.   A lot of modern animation is so heavily computerized these days, it's to the point where everything just starts to look too processed (much like spam!) and loses that human artistic quality; the error, roughness and uniqueness frame-per-frame.  The Japanese have a term for this, they call it Wabi-Sabi.  The art of imperfection.  There is just something so right about something that is wrong, and that is what is missed in animation today.  Animation today is gone through a sterile computer pipeline where everything from line work, color to animation is clean-cut and totally virtual, if there's an imperfection, CTRL+Z!  I think I'll make a blog post on the explanation of these ideas, the history of it and what I am trying to do - stay tooned.

Of course, having animation on computers isn't all-bad.  Heck my background is in software engineering as well as animation, so I have to give computers some love.
What I want to do is marry the organic feel of how hand drawn animation looks, with the speed and ease of a computer-based animation pipeline.

So What I have done with this animation (or A.E. Quickie) is a combination of ideas to make the sequence (or at least the assets, I know the animation isn't that great) look more organic.  I first went with the line work as it is important. A human redraws each frame in a traditionally animated sequence and with each frame that is redrawn there is a minor variable of error in the line (the thickness of the line, the straightness and opacity) which as been applied to the animation below.  As well as other intrinsic variables such as the texture of cell paper and opacity differences of inking each frame.  All of these ideas were applied to the Pikachu animation sequence.


There will be more to this as I study and improve this technique, such as animating (or rendering) on 2's much like traditional animations are done, and figure out / create a plugin to remove motion blur and interpolate in-betweens for frames to give it that nice squash / stretch look.

Tuesday, December 29, 2015

A.E. Quickies and Star Wars

I've decided to start something called 'After Effects Quickies'.  Which are little animations that I create from the ground up.  From art, animation and compositing.

For my first, I decided to create a nifty Star Wars animation for all of the amazing fanboys and fangirls out there! In this animation sequence, it's BB-8 scuttling across the surface of Tatooine (Note Jabba's palace!)

This animation took a total of 4 hours to complete, from artwork, rigging (with DuIK of course!), animation and compositing everything in a pseudo 3D layout.

(Here is a direct link in case the embedding does not work on your browser: https://www.instagram.com/p/_3V0J_juQi/)

Wednesday, October 14, 2015

Making a Face Rotate in After Effects using DuIK

Yup! You guessed it probably by the title of the blog entry.  I have been able to rotate a two dimensional head from side to front using only one set of assets.


Although this rotation is not completed (yet) as some assets still need to move in perspective, this was created using a combination of DuIK and my own expression code to place assets and have them rotate in perspective.


Once this process is completed, I will be posting the code and a tutorial video of how someone  can do this too!

Wednesday, September 9, 2015

First DuIK Tutorial - Creating a Finger Joint

As promised, the long-awaited DuIK tutorial is live! Actually it has been live for some time now, I just wanted to make sure that all of you wonderful people know as well!

In this tutorial, I teach you how to make a deformable finger joint using a puppet pin and startching trick with DuIK 14.  Soon I will be doing tutorials on DuIK15! If you don't know what DuIK is, please check out this site: http://duduf.net/?page_id=151

Otherwise, here's the tutorial! Animate and be merry! Wizard out!

Tuesday, February 10, 2015

DuIK and After Effects

DuIK.


It sounds like a funny word, or something you may find in a home cleaning isle, but it's actually a very handy plug-in developed by Duduf, a french programmer (http://duduf.net/?page_id=151) for After Effects.

It's sole purpose is to rig assets / puppets incredibly easily! This blog post is just a taste of  regarding DuIK, rigging, After Effects and more!  Later I will be posting tutorials, my methods as well as how to extend the capability of DuIK and After Effects with some great programming!


The above image is from an animated film titled 'Airship Dracula', which I was a technical director & technical animator for.  It was created solely in After Effects using DuIK.  To me, DuIK one of the most important (and commonly used) After Effects tools I have in my tool set.

I use After Effects very heavily for many of the animated productions I have worked on.  I'll construct, composite, code and rig using After Effects, so it's no wonder that DuDuf's DuIK would come in handy!

So Wizard, what the heck is DuIK? It sounds like some kind of holy grail or something right? Well it kind of is!


In the image above you can see some solids that form hind legs of various animals.  These solids were constructed in After Effects, and the nulls you see in the image are considered controllers. These solids and controllers work together with various sliders you can add with DuIK.  DuIK connects these solids together with some Inverse Kinematic mathematics to create a realistic limb, and thus give the ability to rig your character or asset a little more easily, turning After Effects into an animation suite instead of an effects and composite software.

Anyone who has used After Effects before can find it somewhat daunting. Some consider it like a Photoshop (with its layering) for video and compositing.  Others just find it as a nightmare and their eyes glaze over, but that's okay! It isn't exactly the easiest program to use.  

With Airship Dracula, one of the responsibilities I was in charge of was taking in drawn assets and rigging them with DuIK within After Effects and extending DuIK's capability to make the rigged characters a little more capable and easier to use for animators, such as giving the animators visual tokens as 'handles' to grab the rigged puppet with for movement. These handles were not renderable and could be turned off to see the asset work underneath, as seen below:


If this is something that peaks your interest and you use After Effects, I highly suggest taking a stroll over to DuDuf's site (link above) and checking out DuIK ver 14.22 (the latest release).

Animate hard!  Keep on the lookout, I'll be posting some goodies regarding DuIK and extending the power of After Effects soon!

Monday, February 2, 2015

Song of the Sea

After seeing that Song of the Sea was recognized for over seven Annie Awards, my girlfriend and I absolutely had to go see it. So over the weekend her and I headed over to Pasadena's Laemmle Playhouse 7 to see just how amazing this film was, and let me tell you, we were totally floored.


From the character designs, background painting, story and final composite, the film was like that of a beautiful orchestra, each section was in complete harmony with the other, I could totally see why it would sweep house at the Annie Awards.

I wish I could go into a brief summary to tell you all what the story is about, but just by doing so, I could totally ruin the film for you, that's just how tight this story was, every frame on that screen was well delivered and there was no filler, no time wasted, no lulls in the story. Tomm Moore really delivers with this film, just as he and the studio did with Secret of Kells.


The art direction of Adrien Merigeau, along with Tomm really painted a tapestry of beautiful Celtic heritage and lore, from beautifully painted backgrounds such as these scenes:


To simple yet extremely well designed and effective characters that really stitched together the world that they created:


So what are you doing there sitting reading this blog post? Go out and check out Song of the Sea! It's definitely a must watch for all.

Can you spot the Easter Egg in this scene?


Thursday, January 15, 2015

A Study on Video / Film Processing

Ever wonder how to achieve that 'retro' look in your film and animation? Here is a video I put together that shows the end product of a process that is explained thoroughly in this blog post! Hold on to your gellies and He-Man action figures - here goes!

As some of you may know, I enjoy the old and vintage, and tend to integrate it with my style of work; from my writings, storytelling and technology.

Currently I am working on a side project, an animated film codenamed 'J2', which takes place in a 1984 dystopia and I wanted to give the animation a vintage quality in not only its art style and story but also the way it is actually perceived on screen.

You may be wondering, “Wizard, what are you talking about?” What I mean simply is how the video will be processed.

In our modern world, we have our computers which can do just about anything, from creating films, to typing reports, heck they've even have them installed in our urinals to play urinating games (Thank you SEGA).

That being said, if we think about the animation pipeline of today, from inception to the final cut and render, the modern day animation is mostly created on a computer now, and so visually (without the use of filters and effects) they all generally tend to look the same, because a computer is digital, a pixel is a pixel. Now this is not to be confused with the actual animation itself, it's more-or-less the media it was created in.

Let me explain...
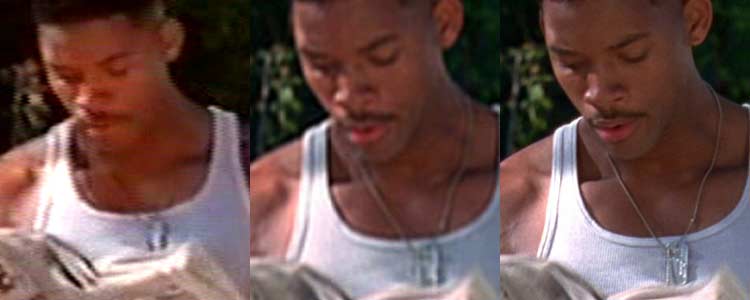
Take a look at this example below:

On the far left is VHS, a medium long gone and deprecated, however it does have a unique look to it compared to the other two examples. Note the strange saturation levels, the over exposed brights and that strange horizontal line that's running through Will Smith. That line you see is an NTSC signal line. Back in the day, images were not created on a screen all at once. At 60Hz (that's 60 times a second!) an image was created in two fields, an odd field and an even field, this made those big, heavy, monsterous television sets broadcast signal a little easier.

Now we move onto the digital age, the DVD. The center image in the set of three is a DVD, it has a little more detail, it lost some of the saturation, and lost the NTSC scanline.

Move onto the far right, that's Blu-Ray, nice, clean, high definition, I can even see Will Smith's nose hairs.

The film in the above example was Independence Day (ID4 as it was advertised all over the place). It was shot on 35mm film using Panavision and then processed.

Now you're probably still wondering what I mean by this processing technique I keep babbling on about, “Wizard! My hotdogs are getting cold, what's this video processing?!” Well hold onto your hotdogs, I'm about to tell you.

What productions do, is they will take their film that they shoot and then bring it into an electronic medium, the process is called 'Telecining' which is the process of scanning each individual frame of film into a video 
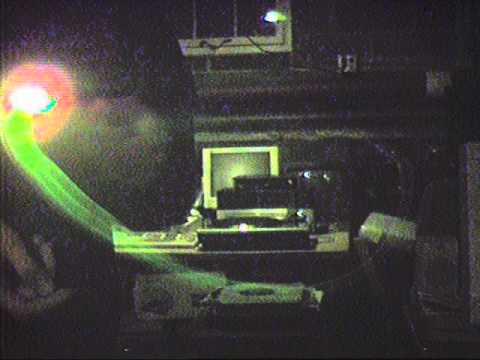
medium, like VHS, DVD or Blu-Ray! On one of these machines:

Now these large machines take in the film, back light it so that it can be seen and then scanned in using a digital image sensor called a 'CCD' (charged coupled device) sensor. These CCD sensors are little wafers that are sensitive to light, they look a little like this:

This process is how it is done in modern day examples if the production is still shot on film (as there is a slow migration to only shoot on video), so in the Will Smith example from earlier, this would constitute all three examples, from VHS, DVD and Blu-Ray, but what about earlier than 1990s?

Well the CCD sensor didn't exist in the early 70's or 80's but we definitely had television, we had films, so that means we had video, and thus the film that they shot on had to be processed, but how!

Here's an excellent example from 'Girls Just Want to Have Fun' (don't ask why I chose this):

The film was released in 1985 which makes it a good visual candidate for the J2 video processing.

Let's take a look at the left, notice how the image is saturated as well as much higher in contrast, the details are lower as well compared to the DVD counterpart on the right. This film was shot using 35mm film and went through the telecine process in 1985 as well as again with its re-release in the early 2000's.

Here's the difference and why they had to telecine again...

The image on the left was telecined not using a CCD and a nice, happy, modern-day machine, but an older, more crude device using vacuum tubes!

These vacuum tubes, or also known as: 'Vidicon', 'Havicon', 'Newvicon', or 'Saticon' tubes work like our old TV sets, a big, glass tube, shooting a beam of electrons through it to produce an image! But in this case, we're going the opposite direction and instead of displaying an image, we're 'absorbing' an image. These video tubes were the precursors to the CCD and the CMOS (the sensors on your phones and modern camcorders / cameras).

Here's what the tube looked like:
And a less science-y image of what they actually looked like:

Pretty scary looking, right? It looks like I could trap a ghost or two with it.
Well these strange looking tubes innovated live broadcast and the home television. They made it possible to convert what it saw into electrical signal, and thus a TV set, unlike film which needed a projector to see.

These camera tubes were very unique, they acted like the human eye in many respects, it had a memory in it. For example, ever had your photo taken by a friend with the flash on? You get that really weird blob in your eye that doesn't seem to go away for minutes? These camera tubes do the same thing! If you flash light on it, it has the exact same effect:

These tubes, unlike modern image sensors, act very differently to light and color (as you can see from the image above), they tend to be more saturated with certain colors, have more contrast by nature and other strange oddities, such as color shifts and hues, which going back to the J2 animated production, could serve a great, artistic purpose!

With all of this history and build up, this was the effect I wanted to achieve in processing the J2 animated film. There are a lot of people out there emulating that 'VHS look' or than antiquated film look, but it's all emulation, and emulation by definition is fake, or 'almost like'. For J2, I wouldn't want to settle for fake, or emulated. It's like having margarine instead of butter for cooking! It just isn't the same!

So I went on this hunt a long while back, I studied it, I analyzed where these formats came from and why and this is why I am writing this blog post now to share my results...

Through the years I picked up a few of these antiquated tube driven machines in the form of camcorders and video cameras to understand how they worked.

Once I understood how these tube cameras worked and how I could get the most out of them (after calibration), I decided to take the next step and understand the telecine process and how I could pick up a telecine machine.

Well, let's just say I couldn't pick one up, they're nearly impossible to find and if I do find one, they're so expensive I'd be living out of a box to pay for it for 30 years.

So I decided to craft my own retro telecine machine. I retrofitted an old tube camera with a telecine home converter box from Ambico and a small LCD monitor on the receiving end.

Here is a wonderful piece of artwork that I spent a whole minute on to explain the idea...

(I will be signing autographs all week, hold your swooning).


My goal with this project was to convert digital video into older analog, then take the older analog back to digital again. This cyclical process would essentially “de-modernize” digital video to make it look more antiquated.

Here is an image of the final setup:


In conclusion, I would have to say that this was a very successful first run, albeit that there are a few things that still need to be worked out to really achieve that vintage look for retro video processing, but I would say it's definitely going the right direction. Hopefully once the animation is done, the final render can then be telecined using this process and not emulated using editor filters or After Effects.


Wizard, out!